Ubuntu offers several clear advantages over other operating systems, particularly for users who value flexibility and long-term stability. As an open-source platform, Ubuntu is free to use, free from licensing restrictions, and continuously improved by a global community, which results in transparent updates and fewer forced changes. Ubuntu also runs efficiently on both new and older hardware, helping extend the life of computers while delivering reliable performance.
Ubuntu provides a powerful, cost-effective, and user-controlled, and private alternative to proprietary operating systems, like Windows 11.
This article is for computers that already have Ubuntu Desktop installed.
Privacy:
Windows 11 collects a significant amount of user data by default, including usage telemetry, system activity, and account-related information, which has caused growing concern among users—especially as creating or using the operating system increasingly requires a Microsoft email account tied to cloud services. Past data collection practices and reported leak issues have further reduced trust, leading many users to look for alternatives that offer greater transparency and control. As a result, interest in Linux—particularly Ubuntu Desktop—has increased because it does not require an email address or online account to use the system. Ubuntu allows users to create a fully local user account during installation, keeps data collection minimal and optional, and clearly explains what information is collected when opt-in features are enabled. This privacy-first approach gives users more control over their personal data and is a key reason many are moving away from Windows 11 in favor of Linux.
Desktop vs Server Edition:
Ubuntu comes in two main versions: Ubuntu Desktop and Ubuntu Server, and each is designed for a different purpose. Ubuntu Desktop includes a graphical interface (windows, menus, mouse support) and is intended for everyday use such as web browsing, office work, media, and general computing. Ubuntu Server, on the other hand, does not include a graphical interface by default and is optimized to run services in the background, such as file sharing, websites, game servers, media servers, backups, and automation tasks. People often use both because they serve complementary roles: the Desktop provides a comfortable, user-friendly environment to manage files, write code, and access services, while the Server runs quietly and efficiently on another machine (or a virtual machine) handling always-on tasks with lower resource usage and higher stability. Using both together allows users to keep daily work separate from critical services while still staying within the same Ubuntu ecosystem, tools, and update system.
Terminal Intro:
CLB: Command Line Blocks
This is a visual of what a CLB may look like.
To open press CTRL + ALT + T at the same time on the keyboard.
Users can copy and paste all text at the same time. However keep in mind that majority of the time each line is its own command and is sometimes best to enter each line separately.

For example:
sudo apt update (First command)
sudo apt upgrade (Second Command)
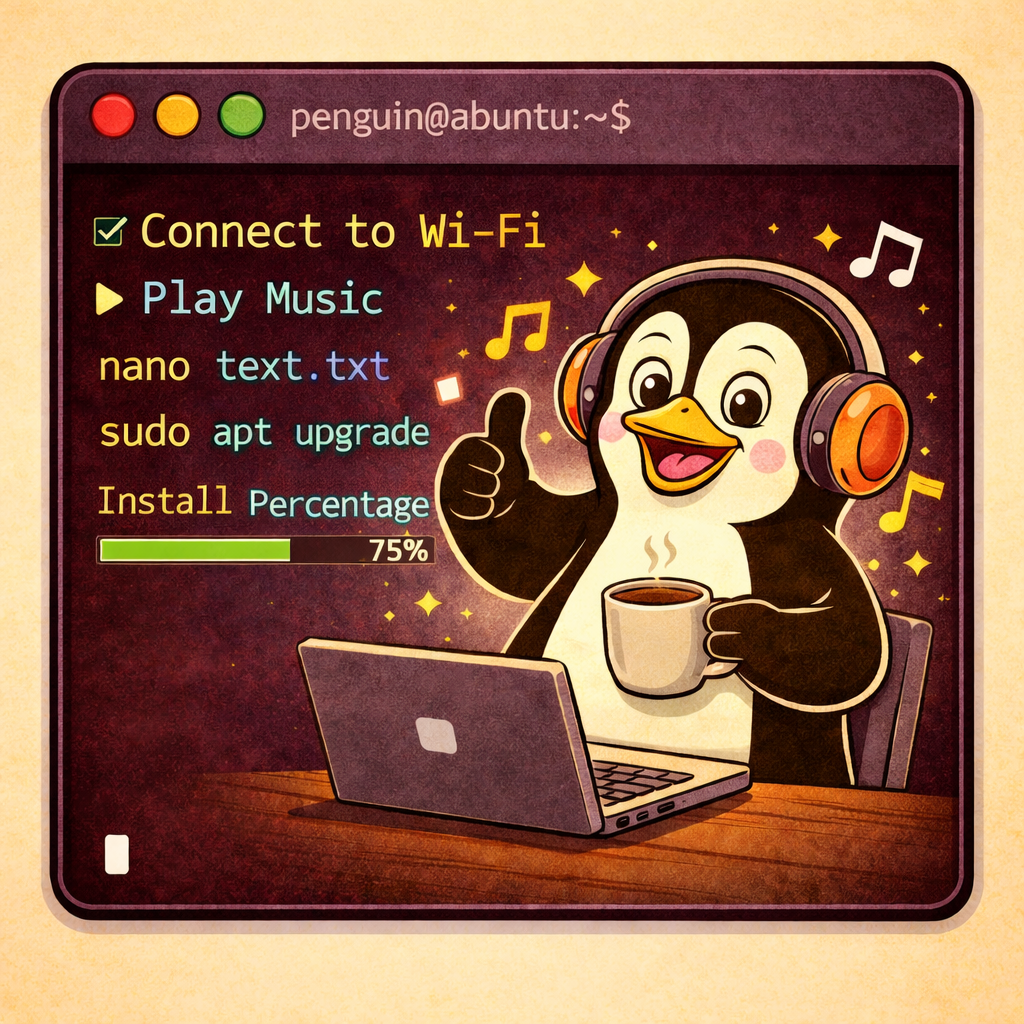
The Terminal is a text-based interface that allows users to interact directly with the operating system by typing commands instead of clicking through menus. It is commonly used for system administration, software installation, troubleshooting, automation, and performing advanced tasks more efficiently than through a graphical interface. It also allows the system to save on resources by allowing the system to make changes or run programs in a low resource mode – Text is easier to process than an Graphical User Interface (GUI).
In many technical articles and guides, sections that display light-colored text on a black background represent commands intended to be typed directly into the Terminal. These sections are commonly referred to as Terminal Command Blocks (also called Command Line Blocks), and they are a standard convention used to clearly distinguish executable commands from regular instructional text.
Using a Printer:
Ubuntu provides built-in support for most modern printers and scanners, but setup is not always “plug and play.” Understanding a few common behaviors will save time and frustration.
Important Notes Before You Begin
- The same printer may appear under multiple names.
This is normal. Ubuntu may detect the same device using different drivers, connection methods, or protocols. - The default option is not always the correct one.
For example, sometimes when connecting a printer via USB, the printer entry that explicitly includes “USB” in its name may not work, while another entry for the same printer (which does not include USB in its name) does. If this is the case then users may look into changing the Default Printer to help automate workflow. - Testing is expected.
It is often necessary to try printing a test page using different detected printer entries until one works reliably.
Setting a Default Printer
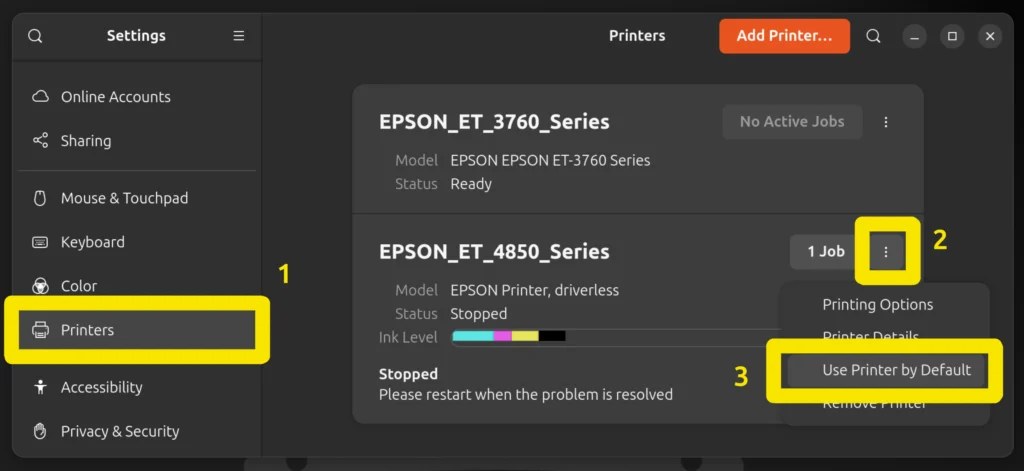
Setting a default printer in Ubuntu’s system settings provides meaningful efficiency and reliability benefits, particularly in multi-printer environments. By designating a default printer, applications automatically route print jobs to the intended device without requiring repeated manual selection, reducing user friction and the likelihood of misdirected prints.
Steps for Setting the Default Printer:
-Press the Super key on the keyboard. It usually has the Windows Logo on it.
-Type and open Settings > Select Printers Tab > find printer and click on the Three Dots > Select Make Default Printer.
If the desired printer is not listed, then
- click Add Printer.
- Wait while Ubuntu searches for available printers.
- If multiple printers appear with similar names:
- Select one option.
- Complete the setup.
- Print a test page.
- If it fails, remove that printer and try another entry with a similar name.
Tip:
If printing fails over USB, try a printer entry without “USB” in the name, or one that references a driver or network-style connection instead.
Document Scan
Ubuntu includes a simple scanning application called Document Scan (sometimes labeled “Simple Scan” depending on version).
How to Scan a Document
- Open the Document Scan app by pressing the super key on the keyboard and typing in Document Scan.
- If multiple scanners are detected:
- Use the Scanner menu to select the correct device.
- Place your document on the scanner glass or into the document feeder.
- Click Scan.
- Choose:
- Single Page for one page
- All Pages From Feeder if your scanner supports it
- When finished, save the scan as:
- PDF (recommended for documents)
- PNG or JPEG (for images)
Depending on the printer users may need to connect the PC to the printer using a Printer to USB cable to receive scans.
Sometimes there will be multiple options to choose one printer. Try selecting both options and running a scan. Even if you do not think the other option will not work. I have seen scanners only work by choosing the printer option that did not make any sense.
Updates:

On Ubuntu Desktop, system updates can be installed quickly and reliably using the Terminal, which provides direct control over the update process. To open the Terminal, press Ctrl + Alt + T on your keyboard, or click Show Applications and search for “Terminal.” Once open, first refresh the list of available updates by running sudo apt update, which checks Ubuntu’s software repositories for the latest packages and security fixes. After the update list is refreshed, apply the available updates by running sudo apt upgrade, and confirm when prompted. This process safely installs system updates, application updates, and security patches, making it one of the most efficient and trusted ways to keep an Ubuntu Desktop system fully up to date. If the Ubuntu PC has any programs installed from the snap repository then type in sudo snap refresh into Terminal to fetch Snap updates.
Update Steps:
Below is a view of the steps in a Command Line Block format. Hotkeys do not require the user to press the “Enter” button afterwards but each line after that requires the user to press the “Enter” button after typing in the line.
CTRL + ALT + T
sudo apt update
y
sudo apt upgrade
y
sudo snap refresh
y
Wi-Fi Connection:
On Ubuntu Desktop, connecting to Wi-Fi can be done either through the graphical interface or directly from the Terminal which is the easiest method for most users.
- Click the Battery icon in the top-right system tray.
- Select the arrow next to the Wi-Fi button.
- Select the desired Wi-Fi network and continue with the sign-in process.
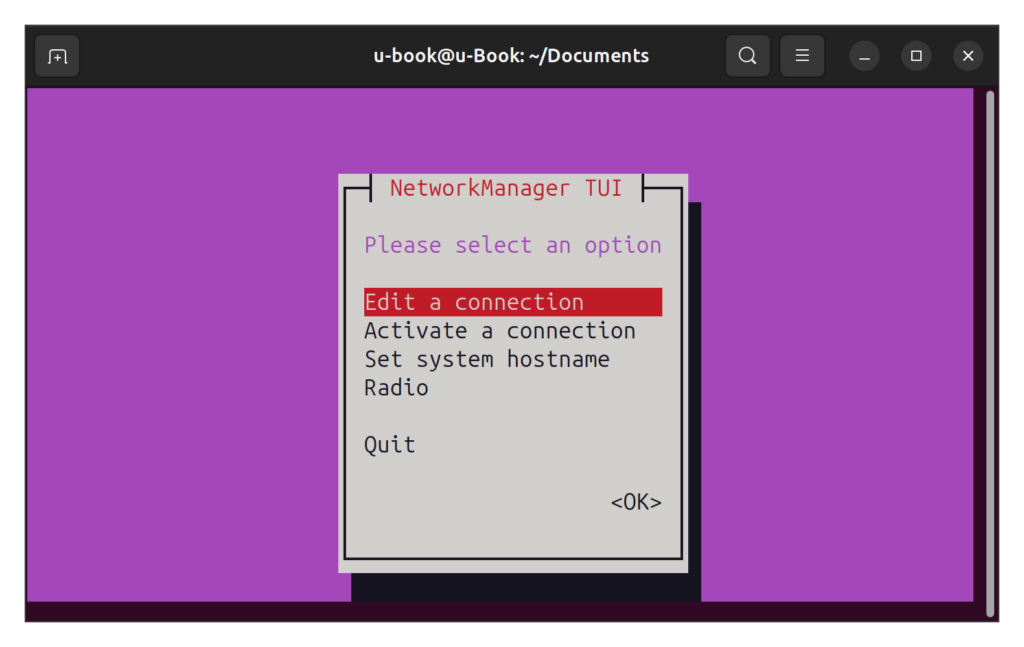
For users who prefer or require the command line, Ubuntu also provides Terminal-based options. One method is to use the nmcli tool, where you can list available networks and connect using a single command, making it ideal for quick setups or remote troubleshooting.
Another Terminal option is nmtui, a text-based menu interface that runs inside the Terminal and allows you to connect to Wi-Fi using arrow keys and menus without memorizing commands. These Terminal methods are especially useful when the graphical interface is unavailable or when managing systems remotely.
Remember that using an Ethernet cable is better than using Wi-Fi when a physical cable is able to be used. I connect devices to my network using Ethernet every time that I am able to. Using a cable provides faster and more reliable network speeds. It can also prevent users from experiencing random disconnects from the Wi-Fi.
Settings:
Ubuntu Desktop provides built-in settings that allow users to adjust display resolution, text size, cursor size, and system appearance without using the Terminal. Follow the steps below.
Change Screen Resolution
- Click Settings from the application menu.
- Select Displays from the left-hand sidebar.
- Under Resolution, open the drop-down menu.
- Choose the desired screen resolution (for example, 1920×1080).
- Click Apply.
- When prompted, confirm the change to keep the new resolution.
If the screen becomes unreadable, Ubuntu will automatically revert after a few seconds.
Change Text Size (Scale Text)
- Open Settings.
- Select Accessibility from the left sidebar.
- Locate the Seeing section.
- Enable Large Text to increase system text size.
For more precise scaling:
- Go to Settings → Displays.
- Adjust Scale (for example, 100%, 125%, or 150%).
- Click Apply and confirm.
Change Cursor Size
- Open Settings.
- Click Accessibility.
- Under the Seeing section, find Cursor Size.
- Move the slider to increase or decrease the mouse pointer size.
Changes apply immediately.
Enable Dark Mode (Dark Theme)
- Open Settings.
- Select Appearance.
- Under Style, choose Dark.
The desktop, menus, and supported applications will switch to Dark Mode instantly.
Installing Programs:
Installing programs on Ubuntu is different from installing software on Windows or macOS, but it is often safer, simpler, and more reliable once you understand the basics. Ubuntu gives you multiple ways to install software depending on where it comes from and how it is distributed.
- Check out my list of Favorite Ubuntu Desktop and Server Apps below.
What Are Repositories?
Repositories are trusted software libraries maintained by Ubuntu and the Linux community. Think of them as a secure app warehouse. Ubuntu uses the APT repository.
- Programs are checked and tested
- Updates are handled automatically
- Security fixes are delivered quickly
- You don’t need to search random websites
Most Ubuntu users install almost everything from repositories.
Ubuntu App Center
This is the easiest and safest method. It is great for beginners to Ubuntu as it provides a GUI (Graphical User Interface) so users can visually see information about the programs.
- Open App Center from the application menu. Ubuntu icon on the Task Bar.
- The name, and icon, of the program may change over time.
- Search for the program you want
- for example: Firefox, VLC, GIMP.
- Click Install.
- Enter your password when prompted.
That’s it. Updates will arrive automatically with system updates. Oftentimes, when I have used the Ubuntu App Center it would slowly load and so I actually prefer installing programs using the Terminal interface.
Installing Programs Using Terminal
Some guides use Terminal commands, but this is still using the same trusted repositories as the App Center. Simply open terminal and type in the command.
Basic steps:
- Open Terminal (Ctrl + Alt + T).
- Install a program using the command formula below:
sudo apt install (Program-Name)
This method is faster but can be a little more tricky than using the App Center Program. Installing programs from the Terminal is not required for beginners.
- For a list of my favorite programs to download check out my Ubuntu Desktop Apps List Here!!
Snap Packages
Ubuntu also supports Snap packages, which are self-contained applications.
Why Snaps Exist
- Work the same across different Linux versions
- Include all needed dependencies
- Update automatically in the background
sudo snap install (Program-Name)
You can install Snaps from Ubuntu Software just like regular apps.
GitHub (Advanced)
GitHub is a website where people store and share computer projects, especially programs and code. It lets many people work on the same project at the same time and keeps track of what changes were made. People can also download files and programs from a Git repository to use on their own computers. Overall, GitHub makes it easier for people to build, improve, and share projects together.
This guide will only be giving a brief introduction to GitHub. It is not recommended for most users but it is good to know that it exists.
Ubuntu makes it straightforward to connect to a shared drive on your local network using the Files application. This is commonly used to access shared folders from another computer, a NAS device, or a home server.
Steps:
- Open the Files application from the dock or applications menu. The icon looks like a folder.
- In the left sidebar, click + Other Locations.
- Under Connect to Server, enter the network address of the shared drive (for example:
smb://192.168.1.50/sharedfolder). - Click Connect, then enter the username and password if prompted.
- Oftentimes the Workgroup will be WORKGROUP by default. However it may be possible that it was changed to another name so be sure to check with the Network Admin to help ensure login credentials are correct.
- Once connected, the shared drive will appear in the Files sidebar, just above the + Other Locations, and can be accessed like any other folder.
After connecting, Ubuntu may give you the option to remember the connection, making future access faster and more convenient.